Azure Container Registry - Connected registries
In this article, we will implement a connected registry architecture with an Azure container registry and we will detail various available features and use cases connected registry can cover.
Whenever we are working in a container-based environment, we need to build and push our applications images into container registries. We have a huge number of options in the market that provide registry capabilities (Harbor, Quay, …) and even if their initial goal is to provide storage capabilities for images, they are enriched with additional features to ease developers and operators activities around image management (image security scan for vulnerabilities, role-based access control, content signing, …).
Azure provide a container registry solution called Azure Container Registry (ACR) and this article aims at presenting you a particular feature of ACR which is the connected registry. It is basically a way to create local/on-premise replicas of our container registry to improve performance and resiliency of local applications.
- Azure Container Registry
- IOT Edge & IOT Hub
- Let’s build our connected registry
- Let’s play with our connected registry
- Conclusion
- Links
Azure Container Registry
Replications
Azure provide an easy way to replicate our container registries in several Azure regions just by enabling multiple regions in our ACR instance as you can see on the following screenshot.
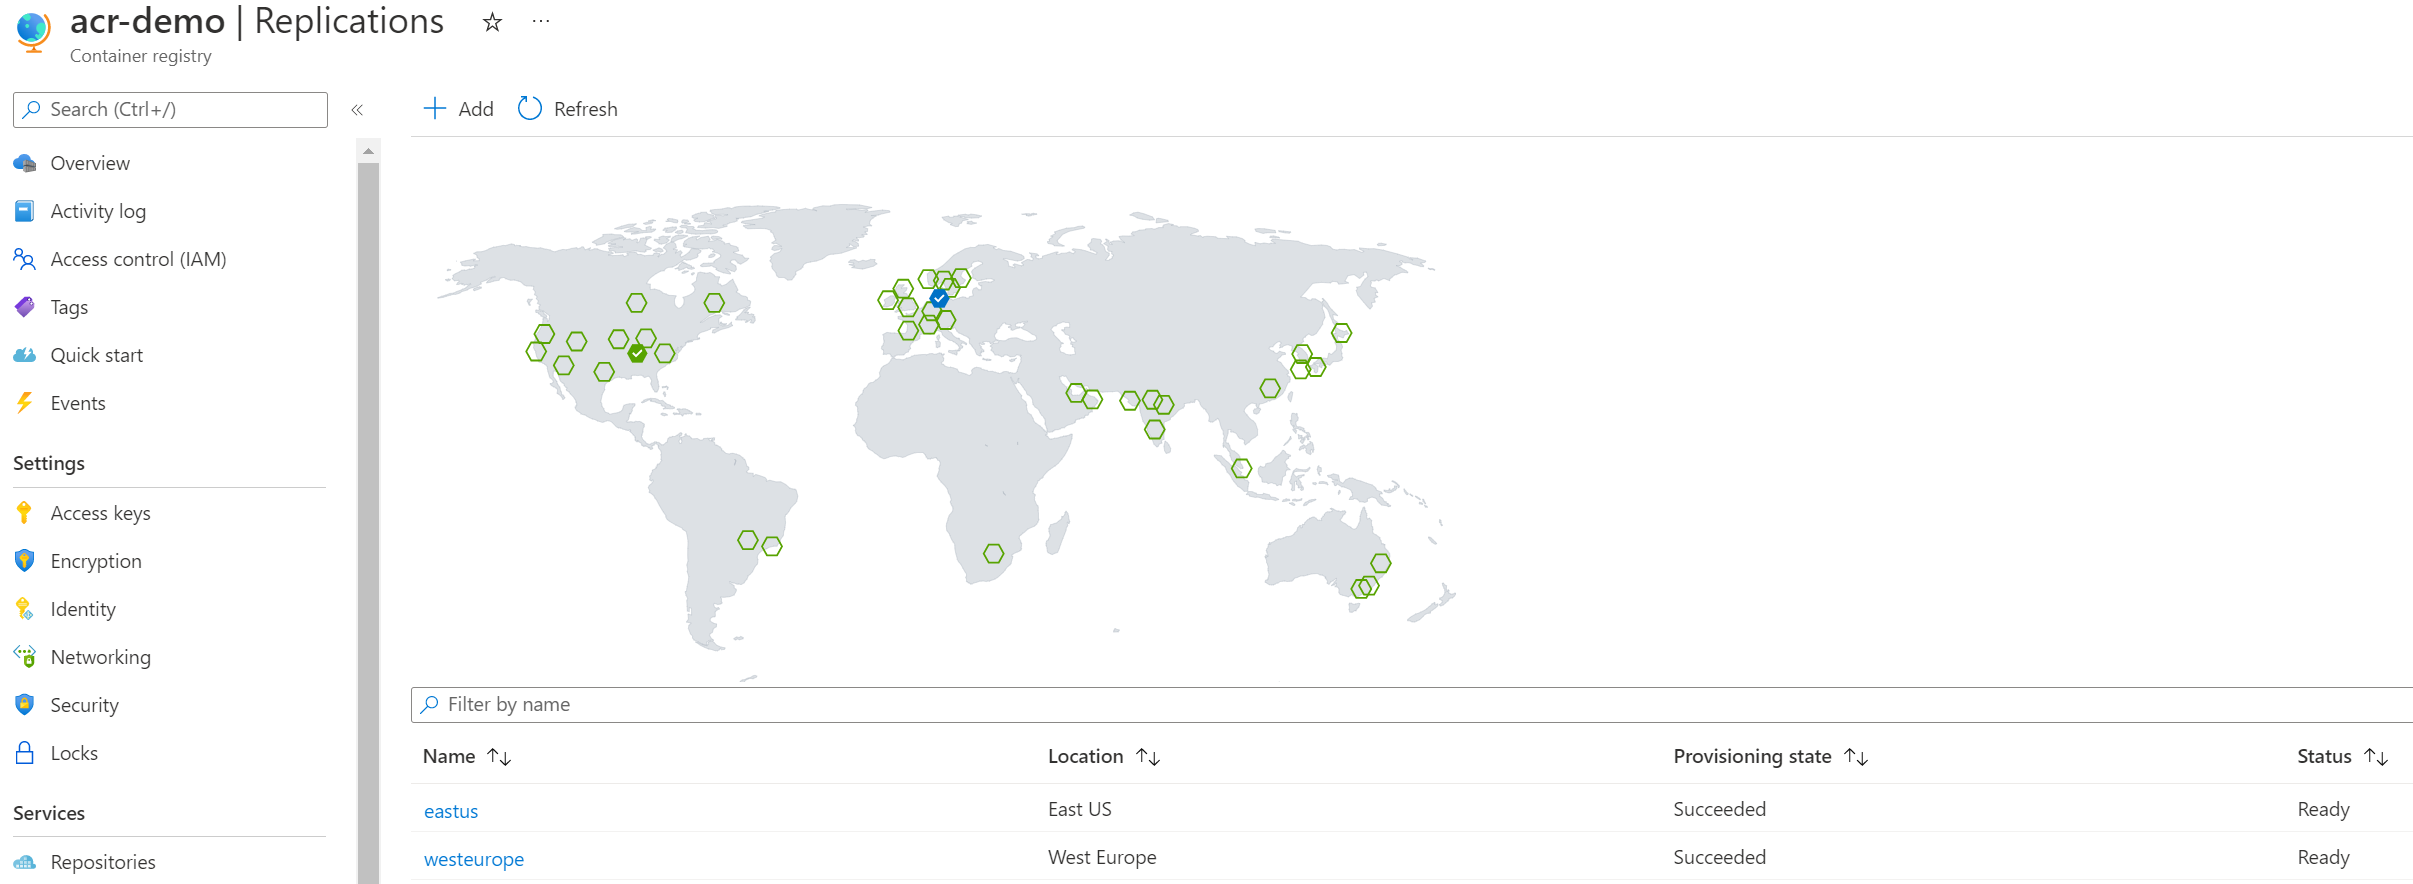
This replication mechanism allows users to have multi master replicas of their registries. It helps improving performance by pushing images closer from where they need to be pulled and it also improves the overall availability of the registry (ACR can be configured in a multi availability zone within a region) by storing images in multiple regions while making their access global with a unique URL.
In most scenarios, this satisfies user requirements in terms of availability and performance but in some use cases, it can still be an inappropriate solution:
- Poor bandwidth to download images (it should be light images, but are they really? :D)
- Factories/Sites with unstable/unreliable Internet connectivity
- Occasionally connected/Air-gapped environments
Connected registry
This is where the connected registry feature can help us to still rely on Azure Container Registry but with a local solution. Here is an extract of the official definition available at What is a connected registry?
A connected registry is an on-premises or remote replica that synchronizes container images and other OCI artifacts with your cloud-based Azure container registry.
Exactly what we need but to get this connected registry deployed in our on premise environment, we need to jump into the Azure IOT ecosystem as it has to be used as a foundation for the connected registry: a connected registry must be deployed on an IOT Edge device.
IOT Edge & IOT Hub
IOT Edge
In our scenario, we will use a solution called Azure IOT Edge. Its main purpose is to provide capabilities to deploy modules and to bring analytics and business logic on devices. IOT Edge comes with IOT Edge modules which are containers that can run services of different nature: Azure services or your own business code.

Running Azure services on an edge device you say? Yes, that is how we will be able to deploy a local registry on remote site called connected registry which will be linked to our Azure Container Registry instance.
IOT Hub
The general definition of IOT Hub extracted from IoT concepts and Azure IoT Hub
Azure IoT Hub is a managed service hosted in the cloud that acts as a central message hub for communication between an IoT application and its attached devices. You can connect millions of devices and their backend solutions reliably and securely. Almost any device can be connected to an IoT hub.
IOT Hub is a powerful solution around IOT management but, to be honest, in our case it will be of a limited help. We only rely on this component because it is required to make a device an IOT Edge device on which we will be able to deploy our connected registry.
Let’s build our connected registry
Architecture
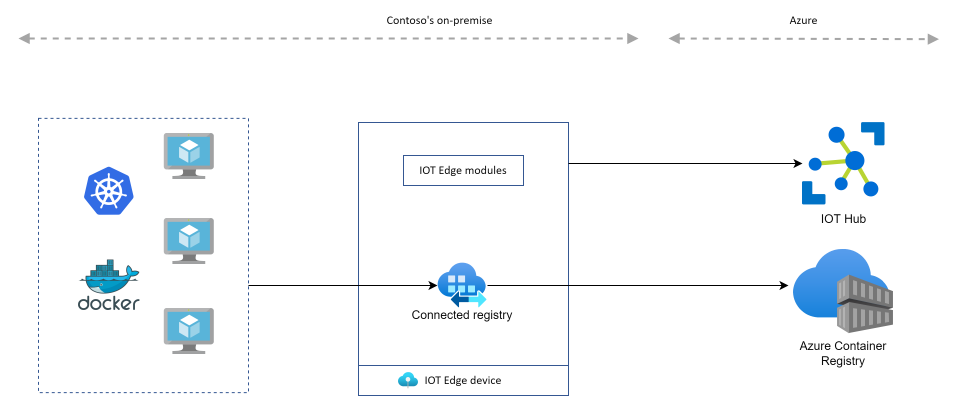
Before digging into the setup details, let’s have a general overview of the architecture we will setup

Create an IOT Hub & IOT Edge device
IOT Hub configuration
Once your IOT Hub is created (if you do not already have one) you have to declare the IOT Edge instance:
az iot hub device-identity create --device-id <iot-edge-device-id> --hub-name <iot-hub-name> --edge-enabled
with
<iot-edge-device-id>is a unique identifier that you must define in your IOT Hub<iot-hub-name>is the name of your IOT Hub
We will then need to retrieve the connection string of our device
az iot hub device-identity connection-string show --device-id <iot-edge-device-id> --hub-name <iot-hub-name>
Make a Linux VM an IOT Edge device
A prerequisite for this step is a Linux VM (Ubuntu 18.04 in our example) already built and on which you have privileged access.
Once logged into the VM we would like to define as our IOT Edge Device, you must play the following commands
# Add repositories
wget https://packages.microsoft.com/config/ubuntu/18.04/multiarch/packages-microsoft-prod.deb -O packages-microsoft-prod.deb
sudo dpkg -i packages-microsoft-prod.deb
rm packages-microsoft-prod.deb

# Container runtime install
sudo apt-get update; \
  sudo apt-get install moby-engine

# IOT Edge install
sudo apt-get update; \
  sudo apt-get install aziot-edge defender-iot-micro-agent-edge

# Setup IOT Edge device identity
sudo iotedge config mp --connection-string '<connection-string-from-previous-command>'
sudo iotedge config apply
You can control that everything went well by typing the 2 commands
sudo iotedge system status
sudo iotedge check
We can also see that our device is ready to get modules from the portal:

You should get a 417 status code saying 417 -- The device's deployment configuration is not set which means that our IOT Edge device is ready to get modules.
Deploy the connected registry on the IOT Edge device
Declare the connected registry in ACR
Activate the dedicated data endpoint
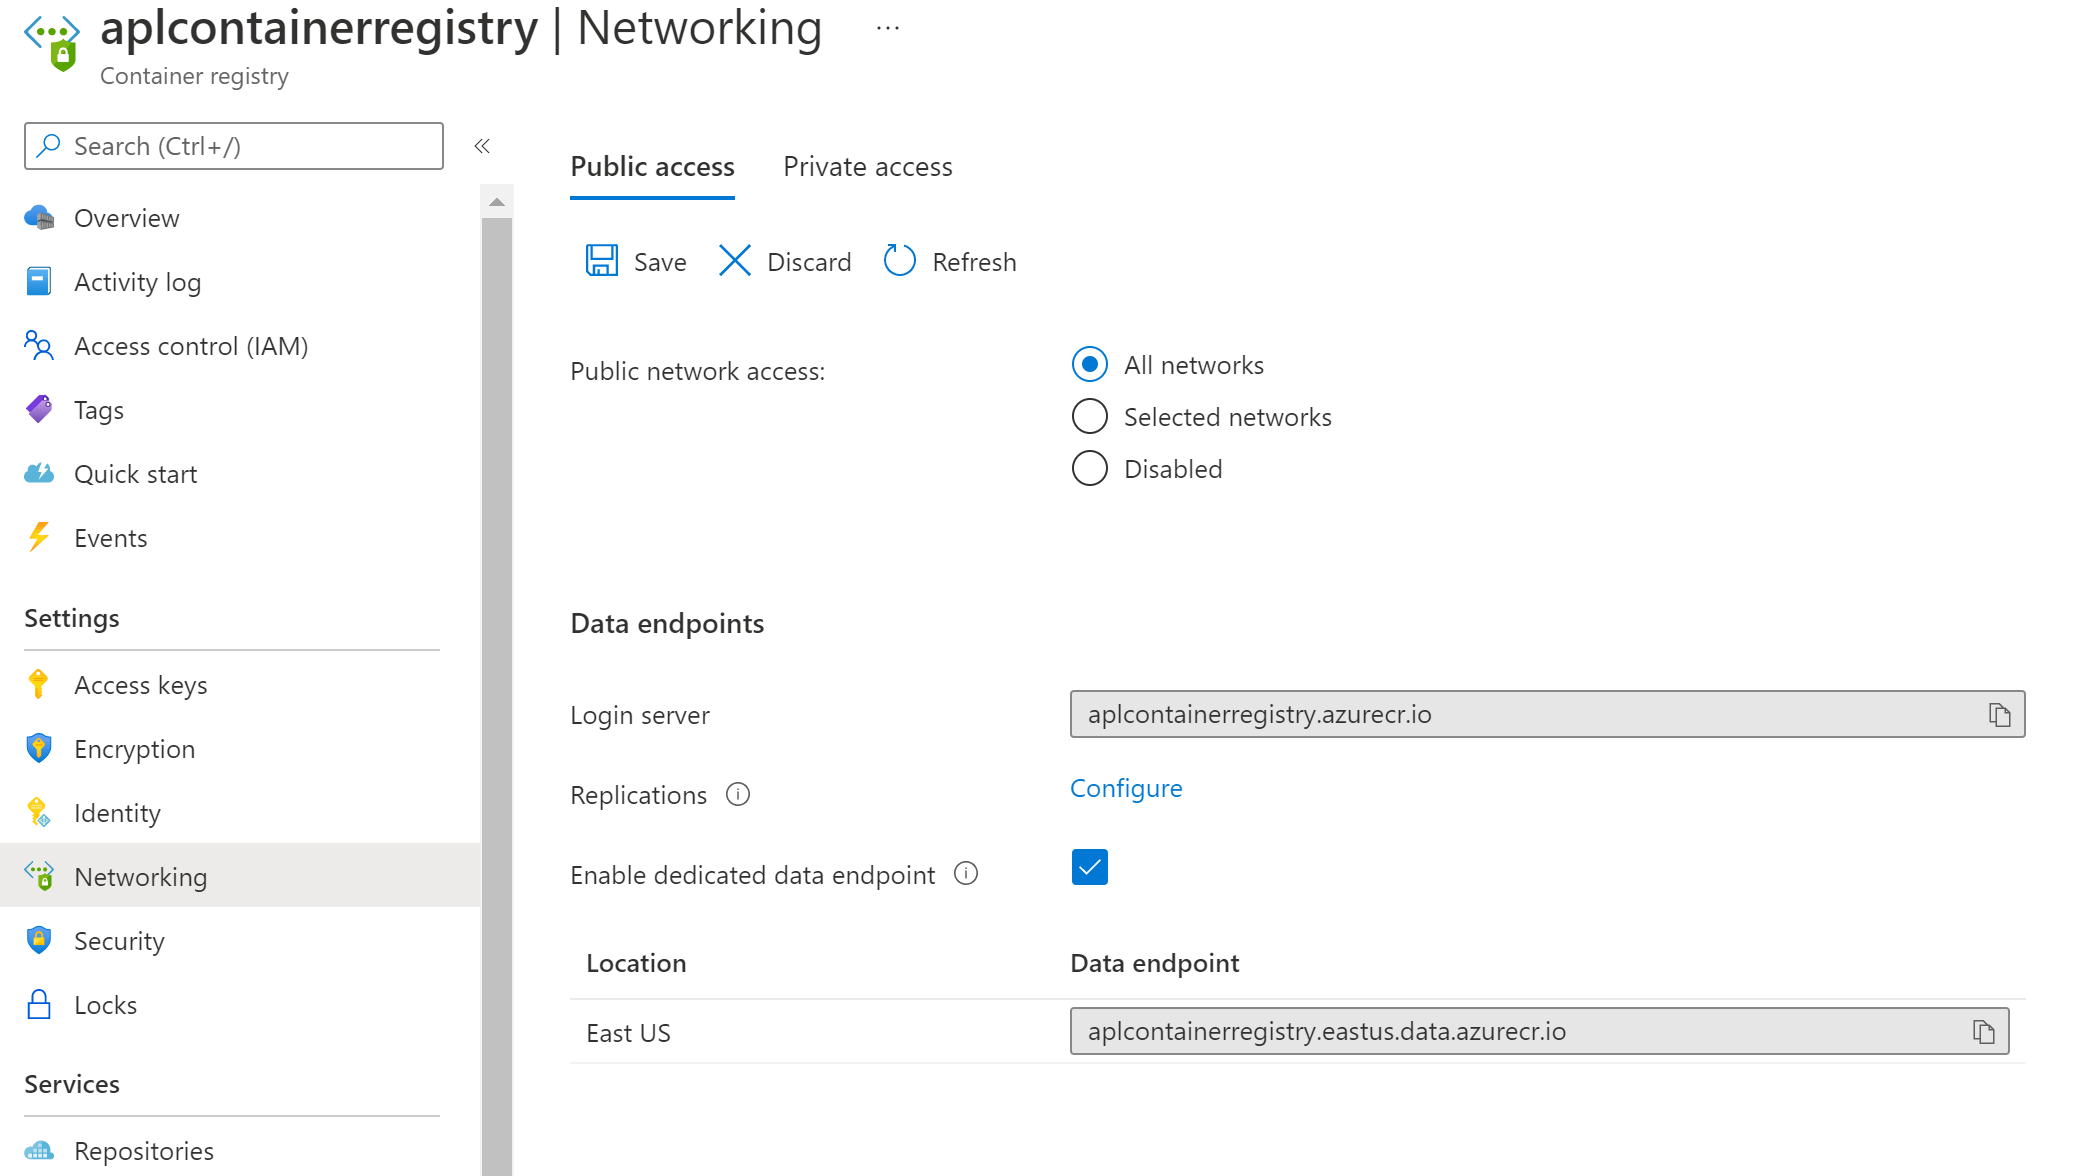
Once you Azure Container registry is created (note that the connected registry is a Premium SKU feature) you have to activate the Enable dedicated data endpoint option:
Import required images in the registry
Next step is to import all required images in our registry:
REGISTRY_NAME=<container-registry-shortname>

az acr import \
  --name $REGISTRY_NAME \
  --source mcr.microsoft.com/acr/connected-registry:0.5.0

az acr import \
  --name $REGISTRY_NAME \
  --source mcr.microsoft.com/azureiotedge-agent:1.2.4

az acr import \
  --name $REGISTRY_NAME \
  --source mcr.microsoft.com/azureiotedge-hub:1.2.4

az acr import \
  --name $REGISTRY_NAME \
  --source mcr.microsoft.com/azureiotedge-api-proxy:1.1.2

az acr import \
  --name $REGISTRY_NAME \
  --source mcr.microsoft.com/azureiotedge-diagnostics:1.2.4
Create the connected registry definition
Now, we can create the connected registry definition in our Azure container registry instance:
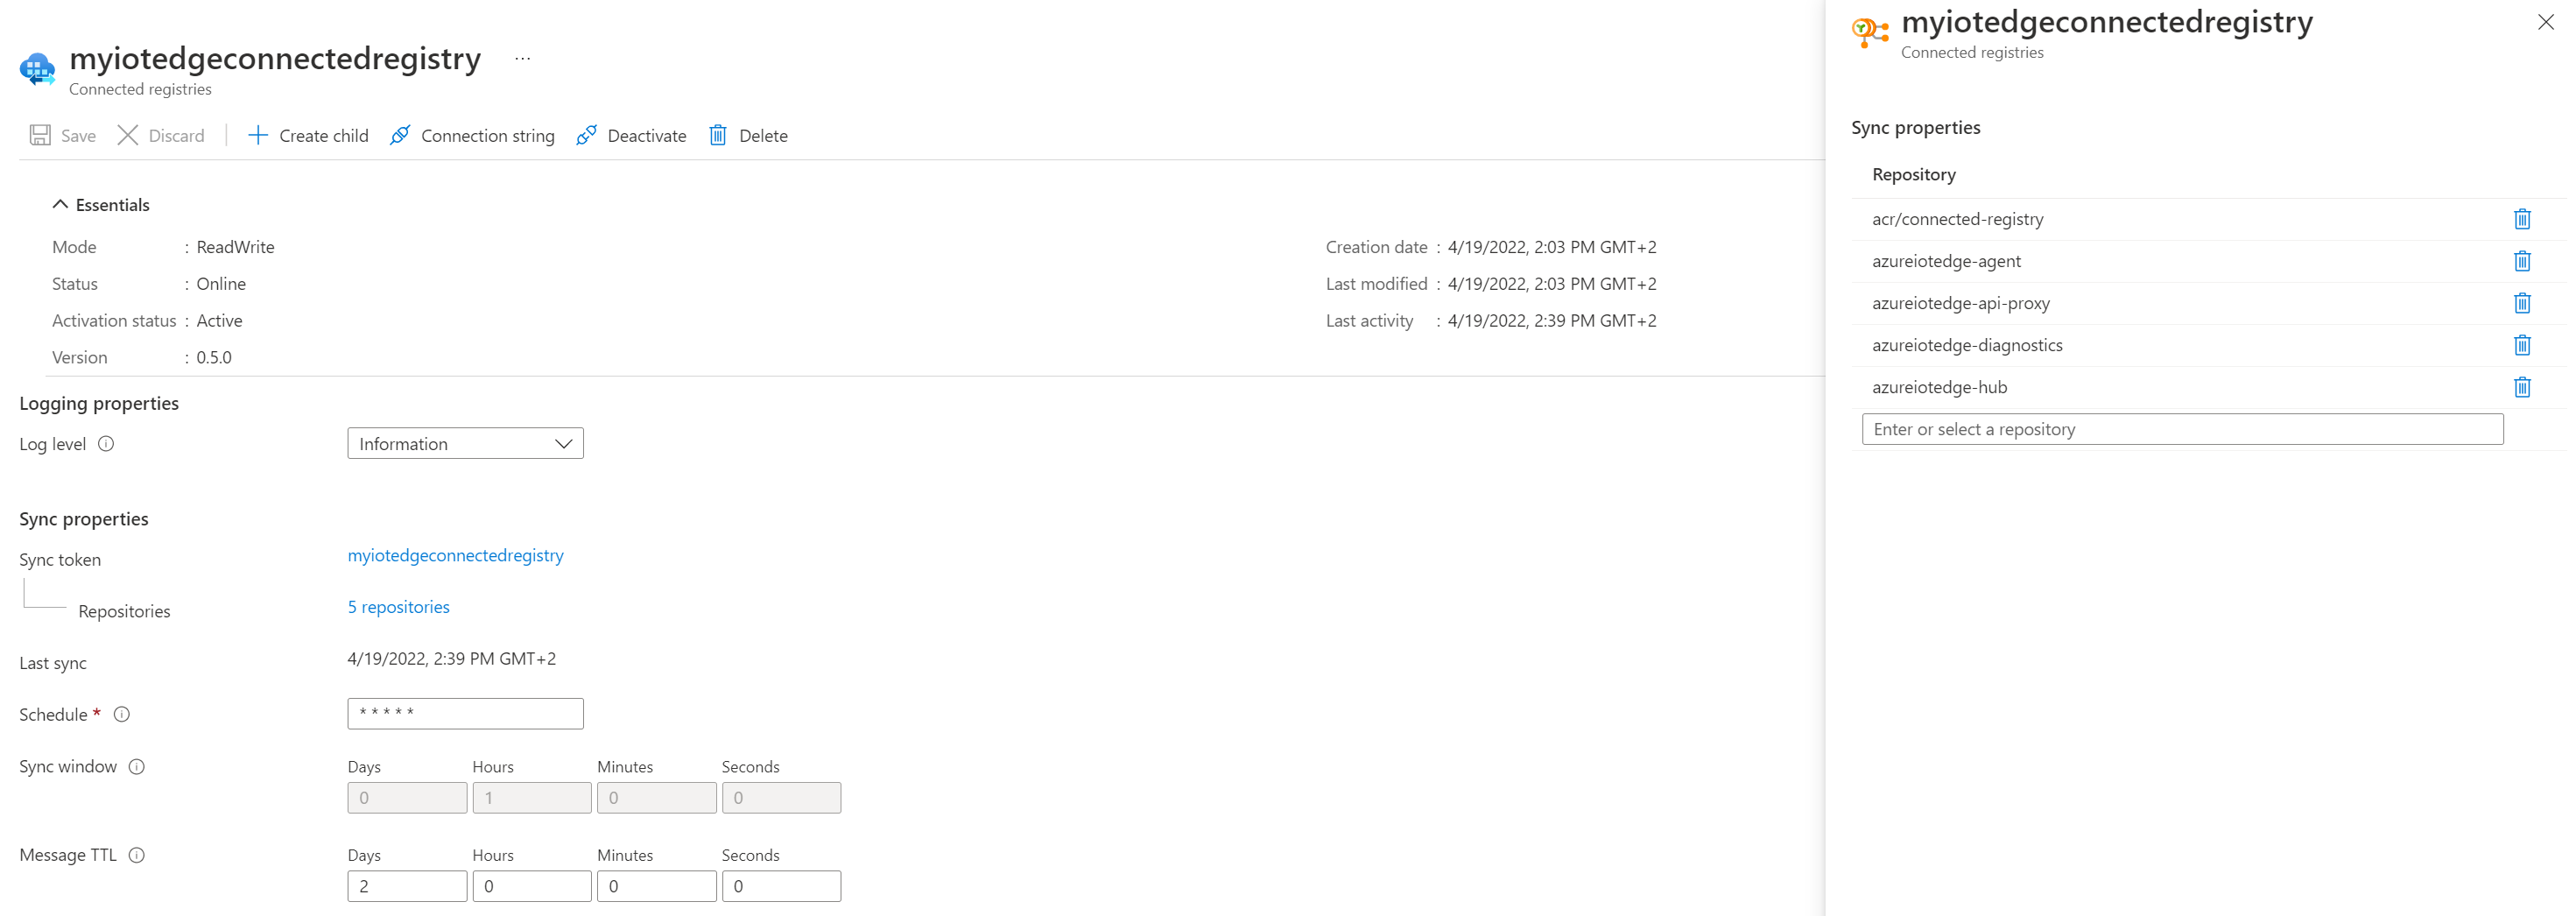
Note that we have lots of options available for
- synchronization behavior
- ReadWrite or ReadOnly modes
- repositories to synchronize
In our example, we choose to get a ReadWrite connected registry.
Once validated and saved, you will see that the status of the connected registry will be offline. So far, everything is normal as we did not deploy the connected registry module in our IOT Edge device yet.
Deploy the connected registry module on the device
Get the connection string and a sync token
The following command is required for 2 important things:
- Get the
ACR_REGISTRY_CONNECTION_STRINGvariable - Generate and get a sync token
These values will be required to generate our connected registry module manifest.
REGISTRY_NAME=<container-registry-shortname>
CONNECTED_REGISTRY_NAME=<connected-registry-name>

az acr connected-registry get-settings \
  --registry $REGISTRY_NAME \
  --name $CONNECTED_REGISTRY_NAME \
  --parent-protocol https \
  --generate-password 1
Fill the module deployment manifest
Adapt the following template by replacing the following values with the appropriate ones:
<REPLACE_WITH_CLOUD_REGISTRY_NAME>: you ACR short name<REPLACE_WITH_CONNECTED_REGISTRY_NAME>: your connected registry name<REPLACE_WITH_SYNC_TOKEN_NAME>: theSYNC_TOKEN_USERwe got on the previous command outputREPLACE_WITH_SYNC_TOKEN_PASSWORDand<REPLACE_WITH_SYNC_TOKEN_PASSWORD>: theSYNC_TOKEN_PASSWORDwe got from the previous command<REPLACE_WITH_CLOUD_REGISTRY_REGION>: the region where you registry is deployed (eg. eastus)
{
    "modulesContent": {
        "$edgeAgent": {
            "properties.desired": {
                "modules": {
                    "connected-registry": {
                        "settings": {
                            "image": "<REPLACE_WITH_CLOUD_REGISTRY_NAME>.azurecr.io/acr/connected-registry:0.5.0",
                            "createOptions": "{\"HostConfig\":{\"Binds\":[\"/home/azureuser/connected-registry:/var/acr/data\"]}}"
                        },
                        "type": "docker",
                        "env": {
                            "ACR_REGISTRY_CONNECTION_STRING": {
                                "value": "ConnectedRegistryName=<REPLACE_WITH_CONNECTED_REGISTRY_NAME>;SyncTokenName=<REPLACE_WITH_SYNC_TOKEN_NAME>;SyncTokenPassword=REPLACE_WITH_SYNC_TOKEN_PASSWORD;ParentGatewayEndpoint=<REPLACE_WITH_CLOUD_REGISTRY_NAME>.<REPLACE_WITH_CLOUD_REGISTRY_REGION>.data.azurecr.io;ParentEndpointProtocol=https"
                            }
                        },
                        "status": "running",
                        "restartPolicy": "always",
                        "version": "1.0"
                    },
                    "IoTEdgeAPIProxy": {
                        "settings": {
                            "image": "<REPLACE_WITH_CLOUD_REGISTRY_NAME>.azurecr.io/azureiotedge-api-proxy:1.1.2",
                            "createOptions": "{\"HostConfig\":{\"PortBindings\":{\"8000/tcp\":[{\"HostPort\":\"8000\"}]}}}"
                        },
                        "type": "docker",
                        "env": {
                            "NGINX_DEFAULT_PORT": {
                                "value": "8000"
                            },
                            "CONNECTED_ACR_ROUTE_ADDRESS": {
                                "value": "connected-registry:8080"
                            },
                            "BLOB_UPLOAD_ROUTE_ADDRESS": {
                                "value": "AzureBlobStorageonIoTEdge:11002"
                            }
                        },
                        "status": "running",
                        "restartPolicy": "always",
                        "version": "1.0"
                    }
                },
                "runtime": {
                    "settings": {
                        "minDockerVersion": "v1.25",
                        "registryCredentials": {
                            "cloudregistry": {
                                "address": "<REPLACE_WITH_CLOUD_REGISTRY_NAME>.azurecr.io",
                                "password": "<REPLACE_WITH_SYNC_TOKEN_PASSWORD>",
                                "username": "<REPLACE_WITH_SYNC_TOKEN_NAME>"
                            }
                        }
                    },
                    "type": "docker"
                },
                "schemaVersion": "1.1",
                "systemModules": {
                    "edgeAgent": {
                        "settings": {
                            "image": "<REPLACE_WITH_CLOUD_REGISTRY_NAME>.azurecr.io/azureiotedge-agent:1.2.4",
                            "createOptions": ""
                        },
                        "type": "docker",
                        "env": {
                            "SendRuntimeQualityTelemetry": {
                                "value": "false"
                            }
                        }
                    },
                    "edgeHub": {
                        "settings": {
                            "image": "<REPLACE_WITH_CLOUD_REGISTRY_NAME>.azurecr.io/azureiotedge-hub:1.2.4",
                            "createOptions": "{\"HostConfig\":{\"PortBindings\":{\"443/tcp\":[{\"HostPort\":\"443\"}],\"5671/tcp\":[{\"HostPort\":\"5671\"}],\"8883/tcp\":[{\"HostPort\":\"8883\"}]}}}"
                        },
                        "type": "docker",
                        "status": "running",
                        "restartPolicy": "always"
                    }
                }
            }
        },
        "$edgeHub": {
            "properties.desired": {
                "routes": {
                    "route": "FROM /messages/* INTO $upstream"
                },
                "schemaVersion": "1.1",
                "storeAndForwardConfiguration": {
                    "timeToLiveSecs": 7200
                }
            }
        }
    }
}
Deploy the connected registry
Save the filled template in a manifest.json file and play the following command:
# Set the IOT_EDGE_TOP_LAYER_DEVICE_ID and IOT_HUB_NAME environment variables for use in the following Azure CLI command
IOT_EDGE_TOP_LAYER_DEVICE_ID=<iot-edge-device-id>
IOT_HUB_NAME=<iot-hub-name>

az iot edge set-modules \
  --device-id $IOT_EDGE_TOP_LAYER_DEVICE_ID \
  --hub-name $IOT_HUB_NAME \
  --content manifest.json
Then, wait a little bit until everything is well in place and check your connected registry status in your Azure Container Registry. Yeah, it is connected!

Let’s play with our connected registry
Application repositories
From an application point of view, we will need to have a repository in our registry with images. As an example will will consider to use the default hello-world image. We need to import the repo in our registry
az acr import \
  --name $REGISTRY_NAME \
  --source mcr.microsoft.com/mcr/hello-world:latest
The second step consists in updating our connected registry to add the hello world repository as the list of repositories to sync:
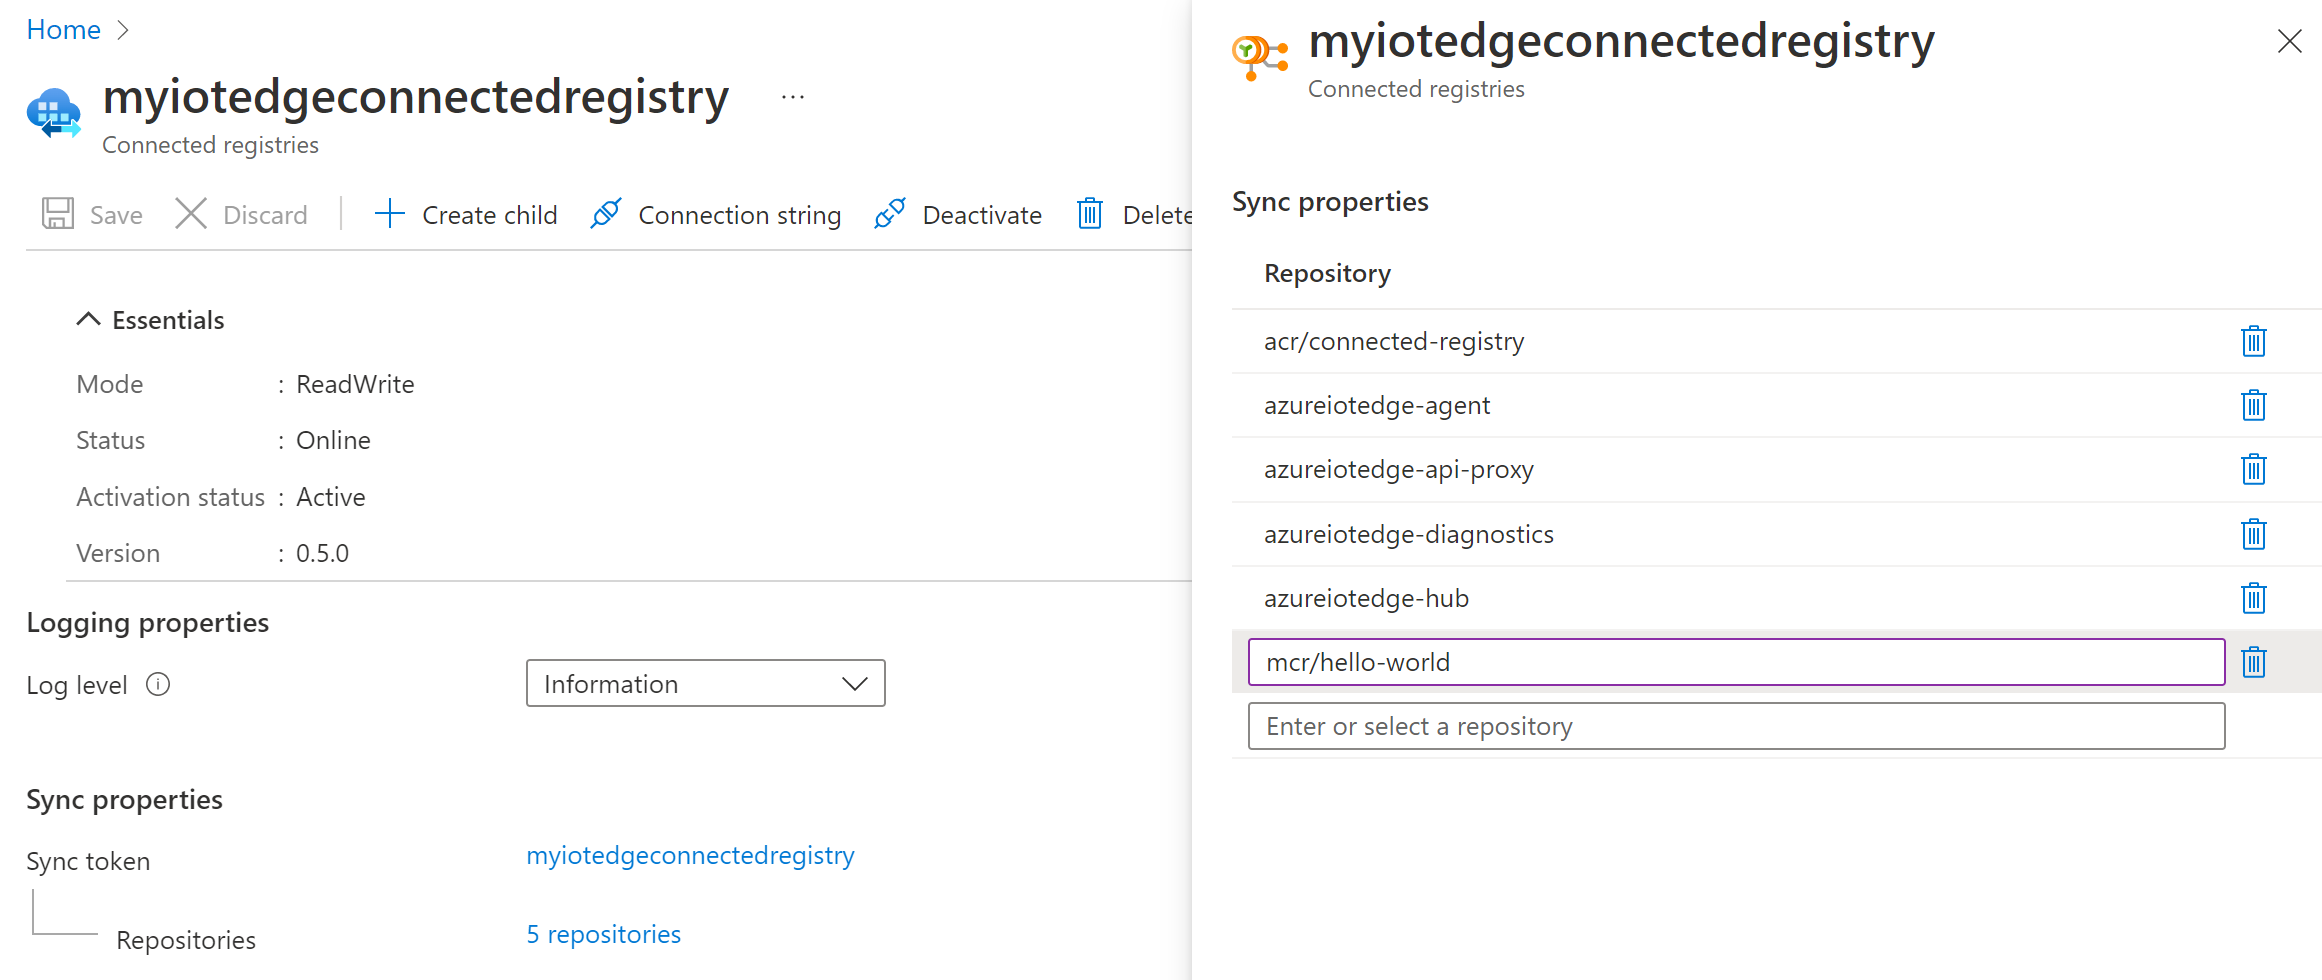
Tokens & ACR Scope map
To pull images from an Azure Container Registry, we need a way to authenticate clients and as registries can be made of many repositories, the way to manage this multi-tenancy aspect in ACR is through tokens & Scope Map. Actually, we already used it before in this article when we used the az acr connected-registry get-settings but we did not explain in detail the mechanism behind. It is pretty simple. For a user to access a repository, we must define:
- a list of accessible repositories and for each, the associated permissions (read, write, delete, …). This is the Scope Map
- a way to give access to a registry (with a possibility to define an expiration time): this is the Token
A token is associated to a Scope Map and we can create all at one in a single command. Let’s do this for our registry:
az acr token create --name hello-world-rw --registry $REGISTRY_NAME \
  --repository mcr/hello-world \
  content/write content/read \
  --output json
This command create a scope map with the appropriate permissions and its associated token with no expiration limit.
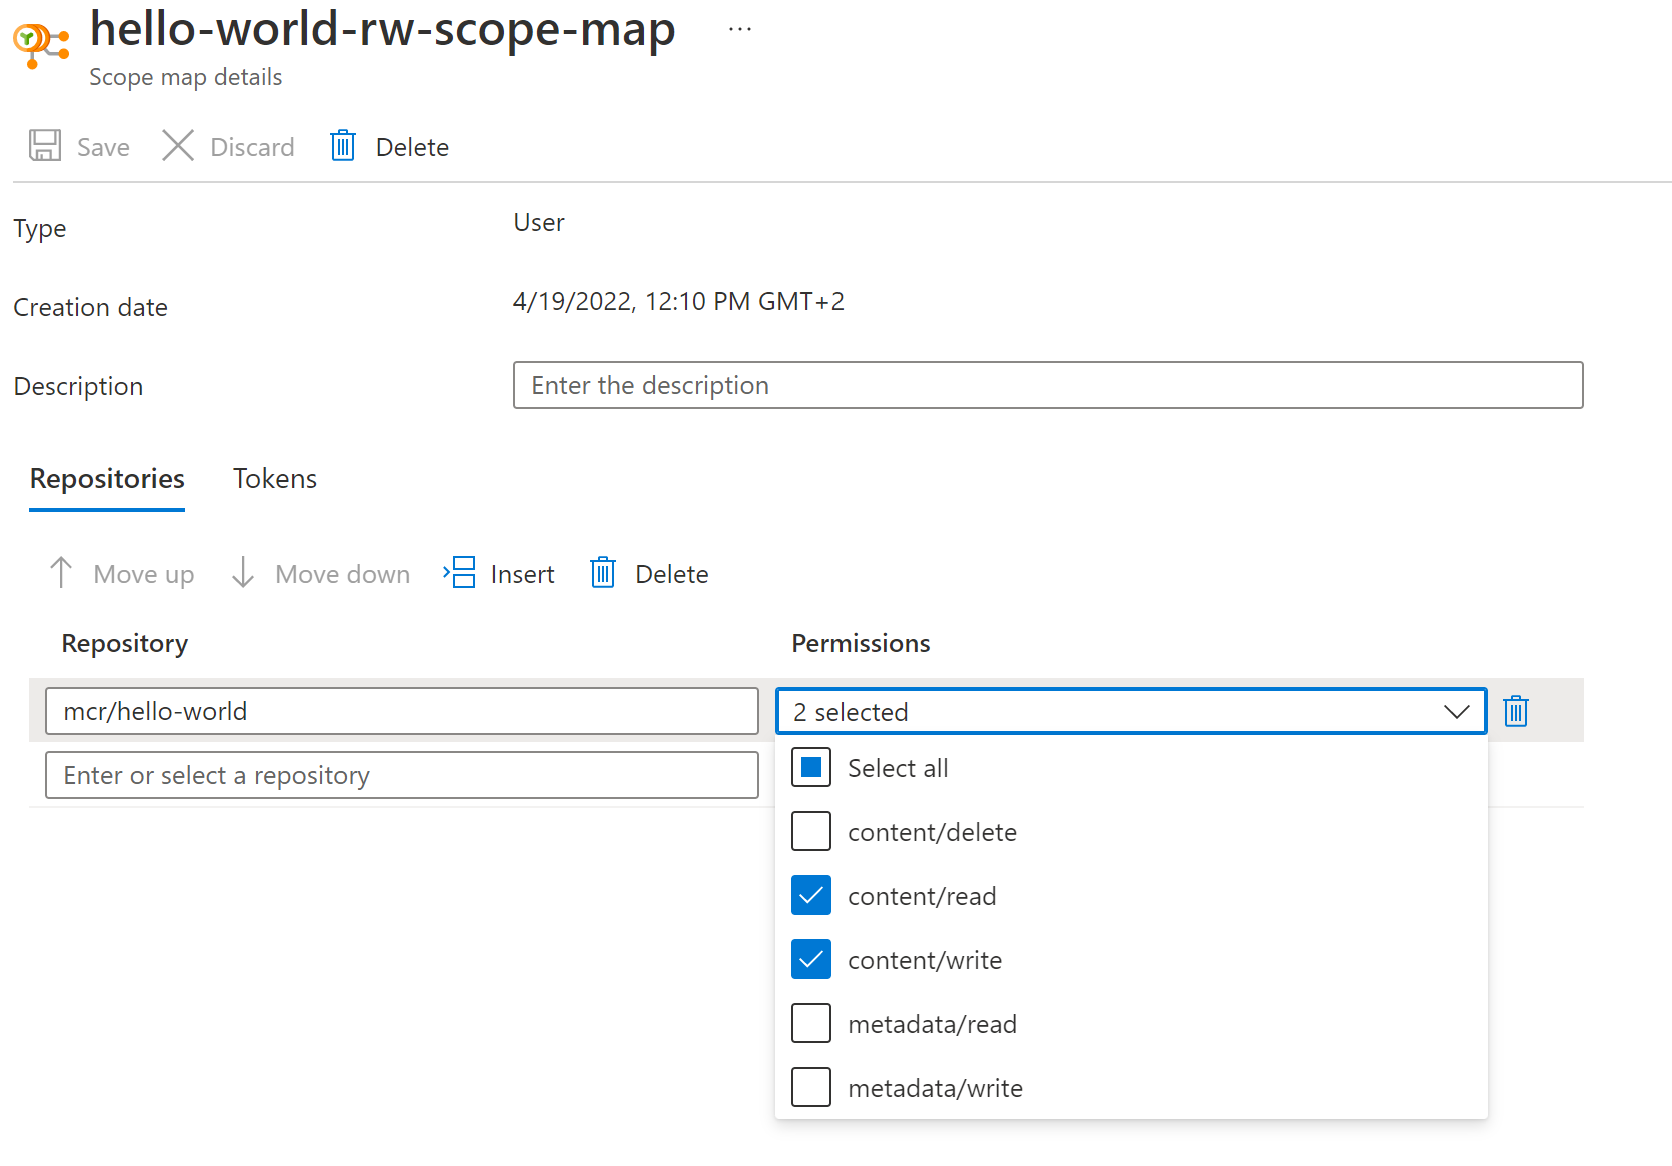
We then update our connected registry with this new token so that users can connect to the on-premise connected registry using the docker CLI.
az acr connected-registry update \
  --name $CONNECTED_REGISTRY_NAME \
  --registry $REGISTRY_NAME \
  --add-client-token hello-world-rw
Pull image from the device
Next step is to connect to a local VM that is supposed to use the connected registry as its container registry. In our example everything is done on the same VM. We first validate that we can connect to our local registry with our token

Once we validated the login step, we can simply run a Docker container to pull the associated image and we can see that everything is working as expected
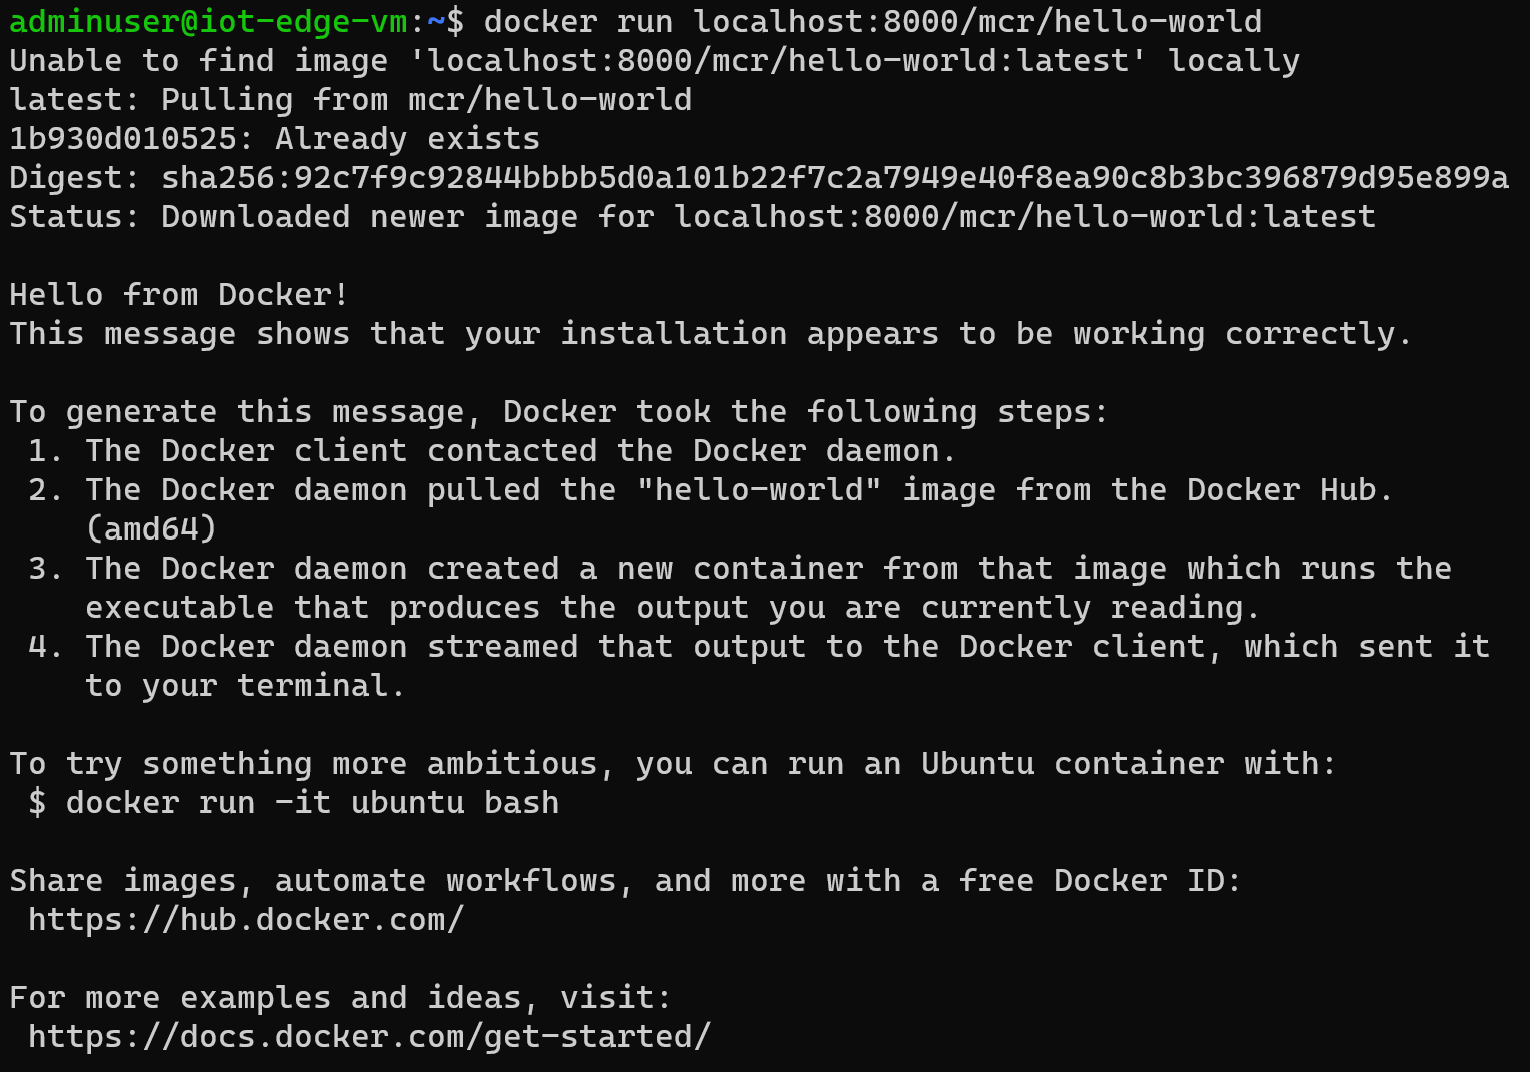
Push image from the device
Now that we have been able to pull an image, let’s try to build our own image and to push this image into the registry. For this purpose, we’ll use a simple Node app
const http = require('http');
const os = require('os');

console.log("Application starting...");

var handler = function(request, response) {
  console.log("Request from " + request.connection.remoteAddress);
  response.writeHead(200);

  response.end(`<!doctype html>
      <html>
        <head>
          <meta charset="utf-8">
        </head>
        <body>
                <div class="center">
                        <p>You've hit <h1>` + os.hostname() + `</h1></p>
                </div>
        </body>
      </html>`);
  }
};

var www = http.createServer(handler);
www.listen(8080);
and its associated Dockerfile
FROM node:17-alpine
ADD app.js /app.js
ENTRYPOINT ["node", "app.js"]
We build the image with docker build -t localhost:8000/generic-js-app:0.1 . and we push the image with docker push localhost:8000/generic-js-app:0.1

Whoops! What did we miss? As we are trying to push to a connected registry (which is synced with our Azure container registry), grants defined earlier apply and we should then extend this grants to add a new repo
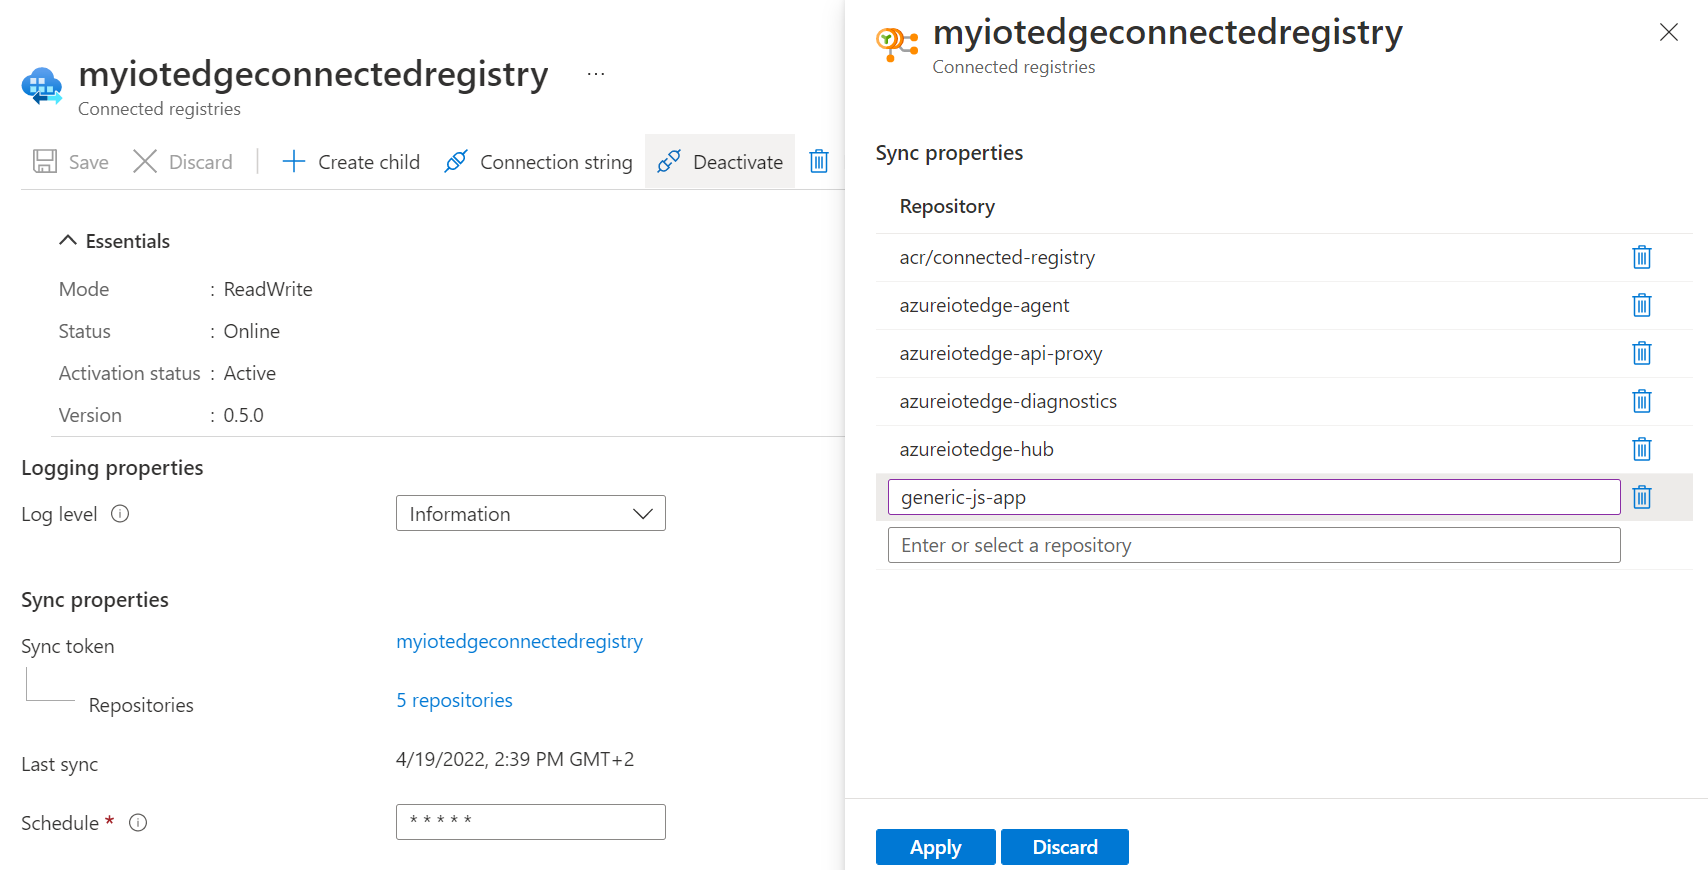
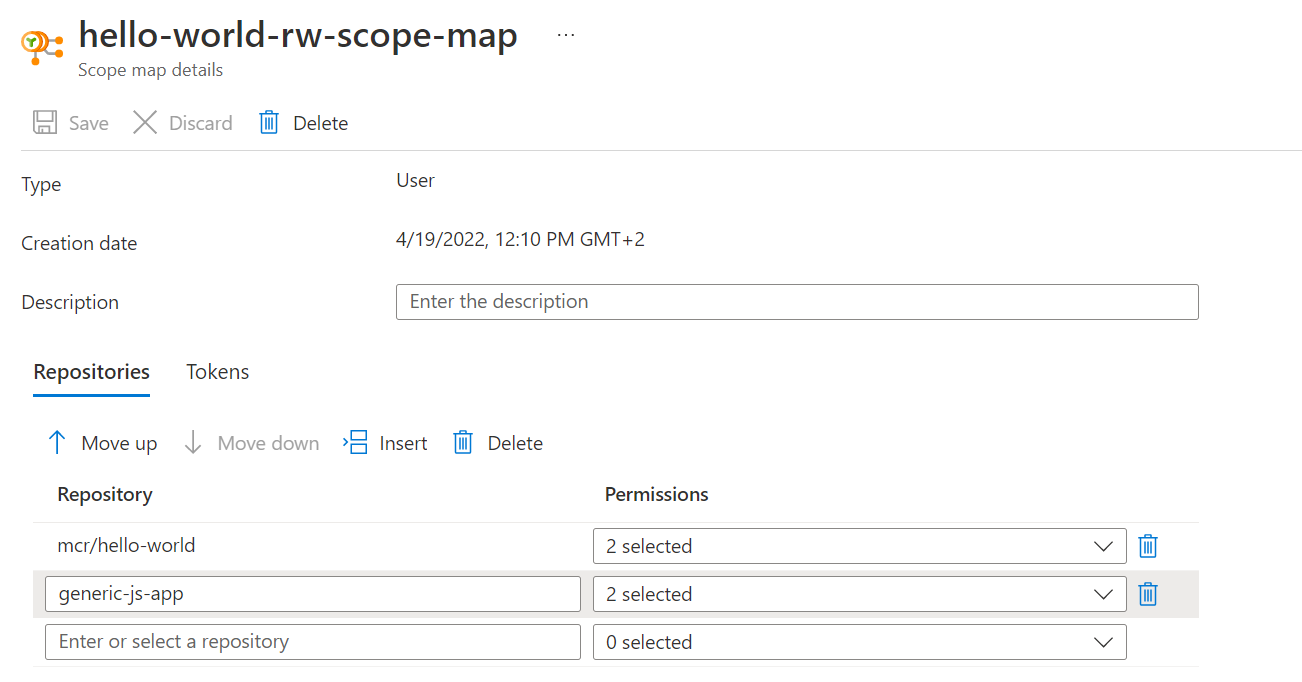
Let’s try again…

Yeah! It works! And, if we have a look at the container registry instance in the portal, we see that our repo and our image have successfully been pushed.

Conclusion
In this article, we have seen how we can combine the power of Azure Container Registry and IOT Hub / IOT Edge device to build local replication (with read/write capabilities) of our global container registry instance. We then tested that both pull and push actions on the local instance are working as expected and that synchronization between global and local instances are working well.
Although there is a possibility to deploy top-level container registries in an on-premise environment through Azure Stack Hub, this is not the same purpose as connected registries which are more local mirrors of central registries deployed on the cloud.
Over the last few months, we have seen the Azure Arc solution enriched by the same kind of capabilities: deploying Azure services on our old good on-premise servers with Arc-enabled data services and App Services on Azure Arc. Maybe, in a near future we will be able to deploy connected registry through this mechanism instead of relying on Azure IOT stack, who knows… Stay tuned!
Links
What is a connected registry?
Deploy IOT Edge on Linux
Quickstart: Create a connected registry using the Azure portal
Quickstart: Deploy a connected registry to an IoT Edge device
ACR Scope Map
